Air Sealing
Stopping air leaks is just as important as, maybe more important than, adding insulation. Unless builders prevent air from leaking through walls and ceilings, insulation alone won't do much good. Not only are drafts uncomfortable, but air moving through insulated cavities can cut the efficiency of the insulation by as much as 50%.
Overview
")
Building scientists now recognize that air barriers are key to how long a building will last, how much energy it will require to heat and cool, and how comfortable its occupants are going to be. In high-performance houses, few building components are more essential, and building and energy codes have become much more stringent. As a result, houses built to code now must be relatively tight.
An air barrier is only effective if all of these seams and intersections are addressed with gaskets, glues, or sealants. Every hole made through an exterior wall should be for one item(wire or pipe) so each hole can be detailed properly.
Getting rid of unwanted air leaks accomplishes three essential goals:
- Saving energy (reducing the cost of heating and cooling the house).
- Limiting the amount of moisture that is carried into wall and roof cavities, thereby reducing potential damage caused by moisture.
- Controlling the source of fresh air that's brought into the house, keeping air quality high.
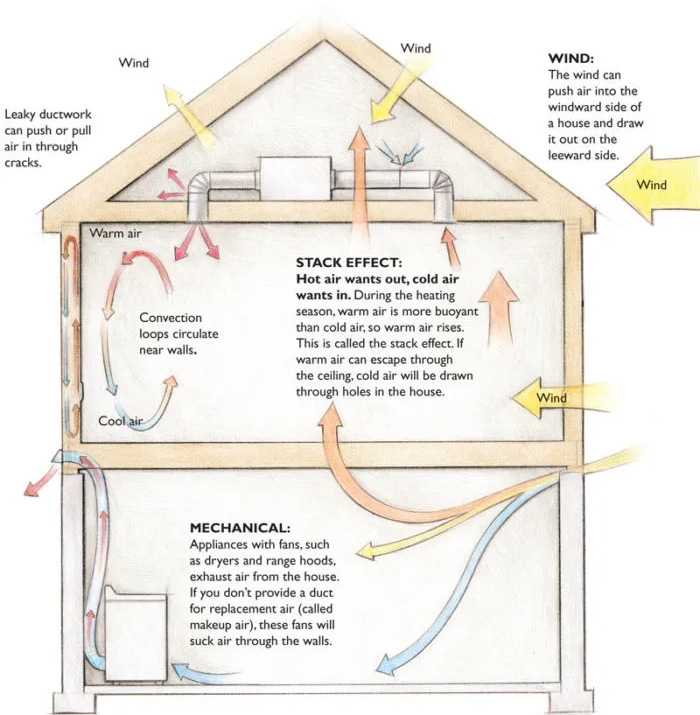
The movement of air through the building envelope is caused by three factors: wind, fans like those in a kitchen or bathroom, and something called the "stack effect," which is the movement of indoor air due to differences in temperature and density. Although no house is perfectly airtight, carefully installed air barriers minimize the effects of these forces.
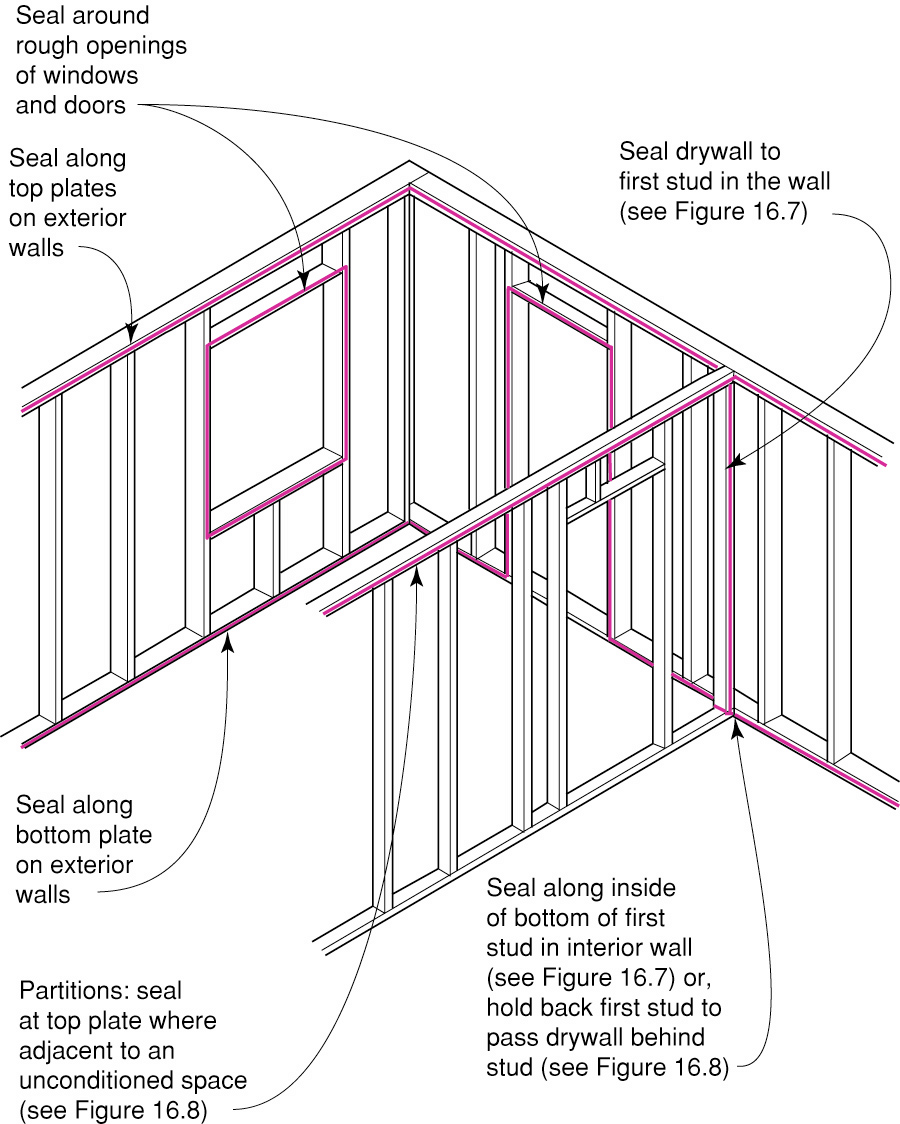
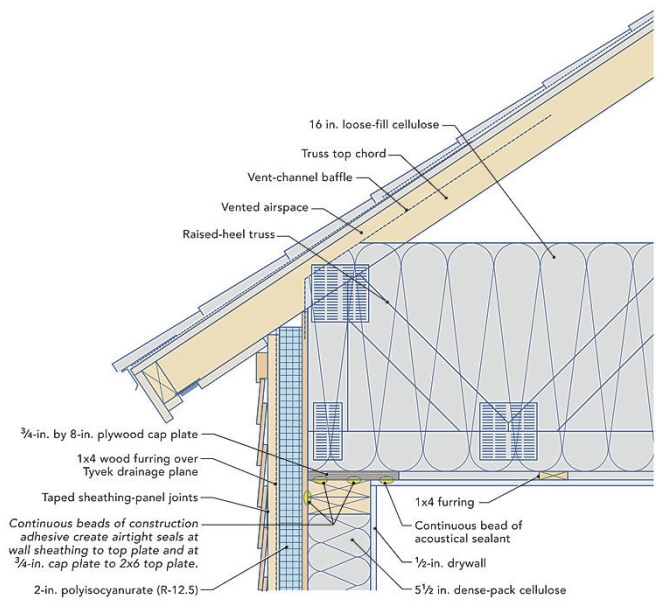
Installing an effective air barrier requires the collective efforts of everyone on the construction team. The designer, builder, and every trade on the site should understand its importance and how their work has the potential to affect its integrity. There is no single method, and no single material, that makes an effective air barrier. Instead, air barriers are really a number of different materials that work together. Everything from caulk and spray foam to rubber gaskets, drywall, housewrap and sheathing can be part of the mix. What counts is how these materials are installed. The success or failure of the air barrier depends largely on a number of tradespeople understanding how an air barrier works, and their role in ensuring its integrity. Although there are lots of ways of getting to the same goal, there are two rules of thumb that apply: the air barrier should be next to the insulation layer, and it should be continuous. Click the cross-section image shown here to download a PDF checklist.
A building envelope should only ever have one vapour barrier, and it goes on the warm side of the insulation. Air barriers on the other hand, can be anywhere in the wall assembly and as plentiful as you like. It is highly unlikely that your air barrier will be flawless, so by all means have a second and a third. This is what is referred to as the "belt and suspenders" approach. As the overall goal is to slow the migration of air through your wall, each additional air barrier will only help, and increase the effectiveness of the previous one.
Include the air barrier in the design
Air barriers don't happen by chance. A clear roadmap should be available to everyone, and that means that key parts of the air barrier should be clearly marked on construction drawings.
Failures usually occur where different materials come together. Here are some typical trouble spots:
- Where the foundation meets the floor framing.
- Where the floor meets the wall.
- Where walls meet the roof.
- At interior kitchen soffits and plumbing chases.
- At cantilevered floors, and the floors of bonus rooms over a garage.
- Around metal fireplaces.
- Gaps between windows and the framing.
- Holes in the subfloor for bathtub traps, and holes into attics for plumbing vents.
- Around recessed lighting fixtures.
Virtually any tradesperson can compromise an air barrier, so a good rule to enforce is that whoever drills a hole seals the hole. Everyone working on the project should be equipped with the materials they need to seal holes they make in the course of their work. Framers, for example, should know whether an EPDM gasket is to be included between the subfloor and all bottom plates on exterior walls, or whether the rim joist is to be recessed to leave room for rigid foam. If the builder or designer has decided to use the Airtight Drywall Approach as part of the air barrier, drywall installers must know where gaskets or sealants are required.
Understanding Why buildings are leaky
Air Leaks - How They Waste Energy and Rot Houses (Fine Homebuilding)
Writing in Fine Homebuilding magazine, John Straube of Building Science Corp. says that air leaks can be responsible for a third or more of energy losses in a typical house. Air leaks also have a powerful effect on indoor air quality. "The only way you can know for sure that the air coming into a house is clean is to know where it's coming from," Straube writes. "People who say, ‘I want my house to breathe' are really saying, ‘I want to rely on the mistakes that were made by the plumber and the electrician to provide me with fresh air.' That's exceptionally dangerous. Any air that enters a house through leaks in the building envelope may be loaded with pollutants. The dead squirrel in your attic and the SUV idling in your garage are not going to provide you and your family with fresh indoor air."
Leaks allow the passage of air, moisture, and pollutants into the building envelope. Wind, fans and the stack effect provide the push. The side of the house facing the wind is under positive pressure, which blows air (and rain) into windows, walls, and roof penetrations. On the leeward side of the building, negative pressure pulls air out of the house. That can pull moisture into wall and roof cavities at the same time.
The stack effect also can force a lot of air through the building envelope. In winter, warm air inside the house is buoyant, so it rises. When it gets to the top of the building and exits through leaks in the building envelope, cold air is drawn in at the bottom of the building. In summer, the situation is reversed. Air cooled by HVAC equipment drops to the bottom of the building and as it does, warm, moist air is drawn in through cracks in the upper part of the house.

Air pressure is also affected by bathroom exhaust fans, range hood fans, and other mechanical equipment. As these fans push air from the inside to the outside, they create negative pressure inside the building. Without a source of clean makeup air, what's pulled into the house can include pollutants like radon from the soil around the house, carbon dioxide (or worse, carbon monoxide) from backdrafting appliances, or exhaust or other harmful fumes from the garage. Some fans move a tremendous amount of air. A big range hood or a gas fireplace, for example, can exhaust as much as 1,200 cubic feet of air per minute.
An effective air barrier is the first step in controlling the effects of these forces.
Focusing on the Inside
Airtight Drywall Approach (Building Science Corporation)
One effective technique for creating an interior air barrier is called the Airtight Drywall Approach, or ADA. Although drywall is a vapor permeable material, it makes an excellent air barrier when detailed correctly, and when painted with a vapor-retarding paint, it also can become a vapor diffusion retarder. Air won't leak through the seams that are covered with paper tape and drywall compound, but leaks are possible at the crack between the bottom of wall panels and the subfloor, at electrical boxes, and at other similar transition points. ADA employs a variety of products to seal these leaks, including gaskets, sealants, expanding foam, and airtight electrical boxes.
For sealing drywall to the framing, caulk can work (experts find polyurethane is the most effective caulk), but gaskets work better. They can be made of open-cell foam, EPDM, or can be made by ripping lengths of foam sill seal. Airtight electrical boxes, which prevent interior air from getting behind the drywall, often include a flange that seals against the drywall, and some means of sealing holes in the back of the box where wires come in.
Focusing on Outside
A Practical Air-Sealing Sequence (Fine Homebuilding)
A construction technique called PERSIST (an acronym for Pressure-Equalized Rain-Screen Insulated Structure Technique) is another way of achieving a virtually airtight building.
Walls are framed with 2x4s, without eaves or rake overhangs. Once the roof and walls have been sheathed with plywood or OSB, they are covered with peel-and-stick membrane and then at least two layers of rigid foam insulation. The thickness of the insulation varies with climate, ranging from 2 in. in Florida to as much as 8 in. in extremely cold climates. Vertical strapping covers the insulation, creating a rain screen, and siding is installed over the strapping. On the roof, 2×4 sleepers are installed over the rafters, which are cantilevered over the wall line to create eaves. Ladder-framing is used to make rake overhangs. A second layer of sheathing is followed by the roofing. The peel-and-stick membrane is a highly effective air and vapor barrier.
Although there are several disadvantages to the PERSIST approach (higher costs and added labor among them), it also offers exceptionally low air-leakage rates along with improved thermal performance. It also works in all climate zones. A variation on this approach, called REMOTE, has been promoted in recent years by the Cold-Climate Housing Research Center in Fairbanks, Alaska.
In buildings constructed with PERSIST or REMOTE techniques, wall cavities are typically left empty — that is, not filled with insulation. This creates a void where wiring, pipes and other utilities can be routed without affecting the integrity of the air barrier. Other builders have achieved the same result by creating service cavities inside exterior walls. These are secondary walls, made with 2x strapping, where utilities can run. The two wall systems are separated by an air barrier, which can be a flexible membrane or sheets of plywood or OSB with the seams taped.
Tedd Benson of Bensonwood Homes is one proponent of this approach. "Wires and fixtures should be separated from high-performance wall and roof systems whenever possible," he told Martin Holladay in a blog. "We add a mechanical chase layer to our walls always, and to our roof panels when there is a heavy mechanical demand in that area. Otherwise, we have dedicated chases at the building peak, at the eave and other strategic locations when necessary. The point is that after sealing a building, we also need to make changes and upgrades easy and provide a path other than one that violates the integrity of the envelope."
This approach also has a few disadvantages. It uses up some exterior space, and it's more expensive and labor-intensive than conventional construction. But it also yields a superior air barrier that is unlikely to be damaged by alterations to the building and is easier to implement than the Airtight Drywall Approach. Some builders, however, continue to favor ADA because the air barrier can be repaired if it's breached. Installing both interior and exterior air barriers addresses the weakness of each approach.
Blower Door Test

A blower door is a relatively simple device used to calculate the rate of air flow through the building envelope at a fixed difference in air pressure between the interior and the exterior. The results of a blower-door test can help weatherization workers understand whether air-sealing efforts were successful.
Blower doors were developed in the early 1970s as researchers struggled to understand air leakage and heat loss in houses. The first commercially produced blower door became available in 1980.
Here's how they work. A frame and flexible panel is temporarily installed in a doorway. In the frame is a powerful variable-speed fan and at least two manometers, which measure air pressure. The tester makes sure all exterior doors and windows in the house are closed, that dampers are shut, and heating equipment is disabled. Then the fan is turned on, forcing air out of the house and thereby depressurizing it. Air from the outside is drawn in through the cracks and crevices that were not sealed during construction. The fan is turned up until the pressure difference between the inside and outside is 50 pascals — roughly equivalent to the pressure of a 16 mph wind, or about 1 lb. per sq. ft. By measuring the flow of air through the frame needed to maintain this pressure difference, the tester determines how leaky the building envelope is. Results can be reported as the volume of air moving through the fan at 50 pascals in cubic feet per minute (referred to as cfm50) or as the number of air changes per hour (ACH50).
")
Houses with 3 ACH50 are considered average/tight depending on your goals. Houses with ACH50 of 20 or more are considered very leaky. Once you get below 2 ACH50 when testing, you will probably no longer be looking at sealing any noticeable holes in your assembly, there will be an accumulation of tiny hole hunting. A product like AeroBarrier may help you get down to those lower numbers. The air-tightness standard in Canada's R-2000 program is 1.5 ACH50. The Passive House standard allows no more than 0.6 ACH50, a very difficult threshold to meet, but could cut heating & cooling in half.
A blower door not only measures the severity of air leaks, but it also gives builders a chance to find and fix them before the house is complete. This process is called blower-door-directed air sealing. Many air leaks can be found simply by walking around the house and feeling for drafts with your bare hands. Leaks that are harder to detect often can be pinpointed with devices like a smoke pencil. With the blower door running, workers can use caulk, spray foam or other materials to seal the leaks. They can gauge their progress periodically by checking air flow at the blower door.
When rigorous air-sealing drops the rate of leakage to 3.5 ACH50 / ~1000 CFM50 or lower, it's time to install a whole-house ventilation system (ERV/HRV) to ensure there's enough fresh air inside. Even with higher rates of leakage, a ventilation system provides a dependable source of fresh air, higher indoor comfort, less energy use and a more even distribution of fresh air around the house.
In the 2012 IECC code, blower-door testing became mandatory and air-tightness requirements more stringent. The current requirements are < 5 ACH50 for climate zones 1 and 2, and < 3 ACH50 for homes in all other zones. For a new home, I would recommend going beyond code and try to get below 1 ACH50(350 CFM50). 2018 Residential IECC Provisions